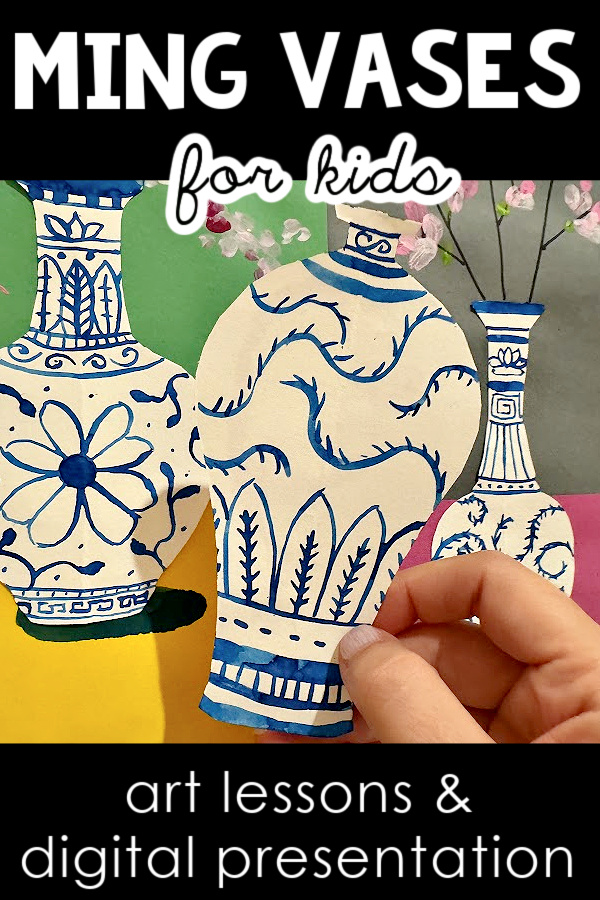
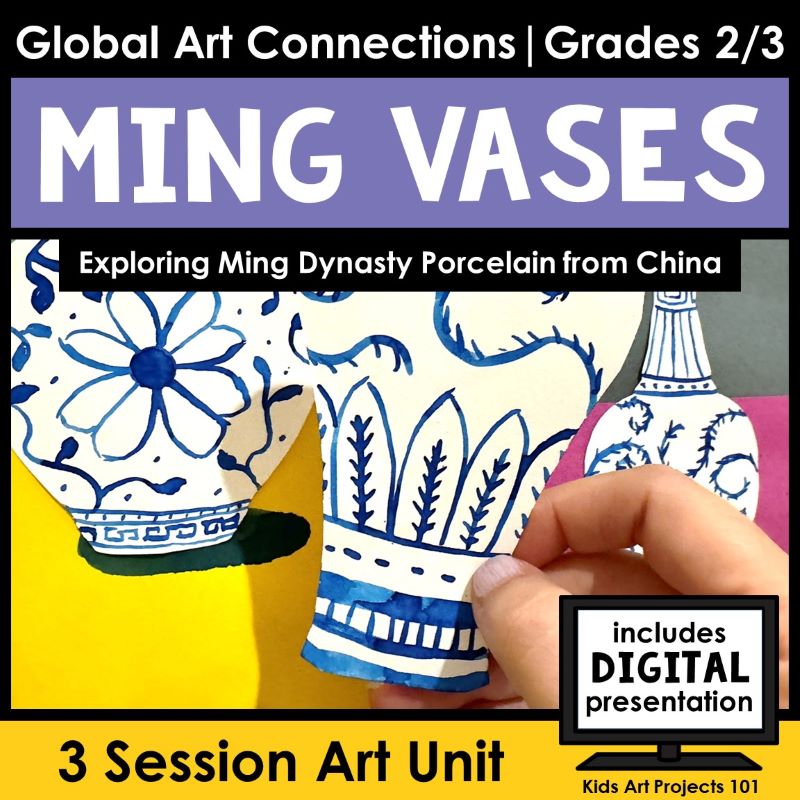
This Ming Vases Chinese Porcelain Art Project is part of my third grade art curriculum. This art project introduces young artists to traditional Chinese porcelain art as they craft their own paper Ming Vases.
Famous Artist Series from Kids Art Projects 101
This approach is awesome because it layers art history connections with guided instruction about the elements of art and principles of design. The scripted PowerPoint format can be easily utilized in a variety of settings. In this video, I share specific tips and considerations to help you easily implement the unit.
Watch the video, or read the transcript below if you prefer.
~VIDEO TRANSCRIPT~
Hi Everyone!
I am so excited to present to you another installation in our Global Art Connection Series. This one is all about Ming Vases. The purpose of this video is to give you an overview of how to set up the unit so that once you start it with your kiddos, you can hit the ground running. So let’s dive right in. This one is organized into three distinct sessions, ideally 40 to 45 minutes each. If you need to modify that a little bit to meet your needs, you should be able to.
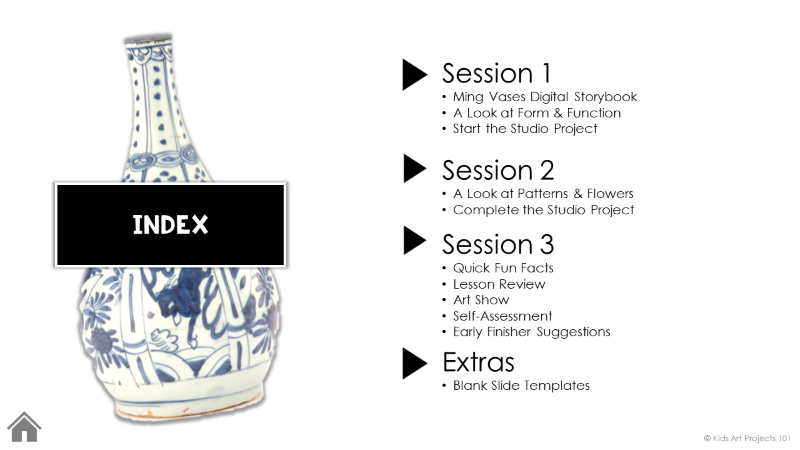
MING VASES CHINESE PORCELAIN ART PROJECT SESSION 1
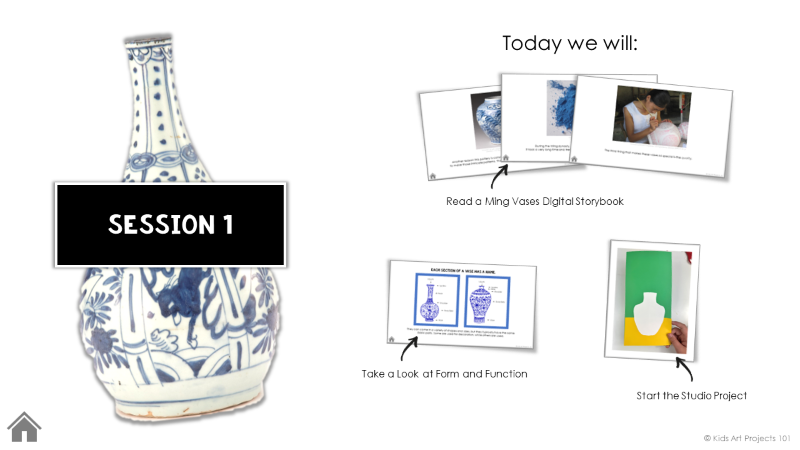
Digital Storybook
In Session 1, you will be presenting a digital storybook that aims to give kids a sense of Ming Vases. What we’re referring to, in this particular case, is blue and white porcelain from the Ming Dynasty in China.
Now the purpose of the digital storybook is to give kids a sense of why this stuff is worth knowing about, what’s so important, and what makes it special. I think the digital storybook does a good job of that. It’s complex and I worked hard to make it super kid-friendly.
I found that older kids seem to eat it up too. They love it because it makes connections to history and geography. So, take a look, and if you feel you want to simplify things a little bit for your little guys, you can. But, I find my second and third-graders love this stuff and keep coming back for more.
So in the digital storybook, I want to point out, is a quick link to a short two-minute video on YouTube. It shows the process of Kowloon clay, which is the clay used to make porcelain, being refined and transformed into porcelain.
It is a fascinating video and I love it. I love the length of it. I love the narration. All of it. I did a lot of digging and searching and most comparable video content about this particular type of vases are much longer videos than this one, which doesn’t work for little guys. So I love that this one is short.
There’s one catch in the video. It shows a guy with a cigarette. It’s very short. They just pan by while he has a cigarette. He doesn’t have a cigarette for the rest of the video but I just wish he didn’t have that cigarette. I choose to show this to my kiddos and I will make a point to mention it at the beginning and I brush it off with, “Can you believe this guy?” It’s very dated.
But you know your student population. You know your administrators. You know your kiddo’s parents. I encourage you to preview the video. If you feel like, “No I’m not showing that in my classroom,” skip it. It’s just an enrichment video to give a little visual to the kids but it is not essential to the digital storybook to play that video. So use your best judgment.
A Look at Form and function
Once you get to the end of the digital storybook, you are going to give kids some vocabulary words relating to vessels. So you’re having them look at words like the lip, the neck, the shoulder, and the body of the vessel. You’re also having them make some connections to vessels that might be in their house.
You want to make that personal connection. “What’s my connection to these vases?” You want to help them understand that these are very similar to a coffee mug, a plastic or a glass vase that you might have in your house, or a glass or plastic pitcher in the fridge.
So you’re giving them a chance to make some connections and listen to other kids in the class make some connections to vases. Then you’re going to dive right into this studio project.
Start the Studio Project
For Session 1, the studio project has kids getting some construction paper and gluing it together like this. You give them one small piece, one tall piece. This is going to be a table. This is going to be the wall.
Then they are cutting out a vase shape to apply. That gets you to the end of Session 1. There’s a whole process of steps to get this thing cut. You’ll be able to see it in the slideshow. I just want you to be aware that you’re going to need to access this, which is in this resource. It’s a stencil printout.
I tried really hard to get this all on one page, to make it as efficient as possible for printing, as far as ink goes and paper and all that. Basically, they are going to cut each of these stencils out. There are six of them on one page. When you cut them out, it’s like this, you’re cutting out half of a vase.
They’re labeled by letters in the slide show they’ll be able to see. If I use the A stencil, what is that going to look like once it’s in a whole vessel form? So that takes out the mystery on that part. The slide show will walk them through step-by-step how to use that stencil to create a fully symmetrical vase.
There is a printout of that stuff. I tend to show the kids on the screen, on my Smart Board. Then I physically demonstrate it also. Then I print these out and put them on the tables. I find if I go for that kind of trifecta, my success rate skyrockets.
When you rush through it, you get a lot of kids who do it backwards. They end up with broken vases, discouraged and wasting a lot of watercolor paper. So, take the time to really make sure they understand that process.
Second grade can handle this sequence of steps. They’ll feel really proud and wild at the end that it worked, but you’ve got to show them how to do it. Now they glue everything together. That brings you to the end of Session 1.
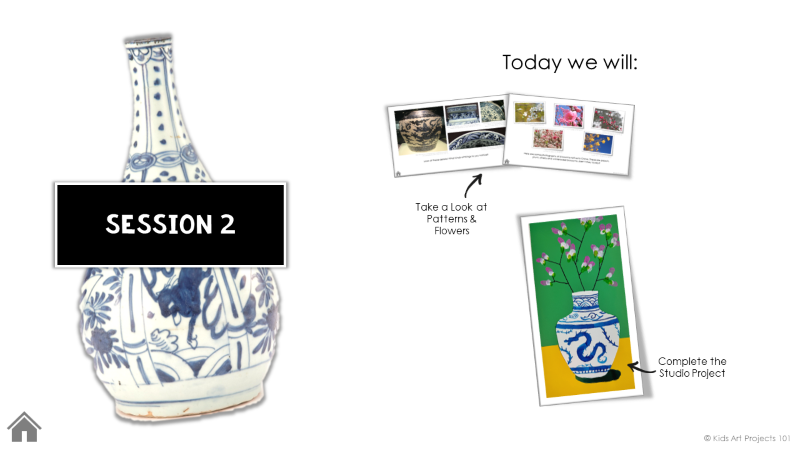
A Look at Patterns and Flowers
In Session 2, you are going to kick off with a quick close-up look at the patterns on the vases. Obviously, there’s an unlimited amount of patterns on Ming Vases.
You’re showing them a couple of close-ups, and then you’re going to show them a close-up of some flowers that are also native to China, because both of those are intended to inspire the remainder of the work in the studio project, which is what Session 2 is really all about.
They are going to be doing a lot of Studio work in Session 2. Their goal is to get the whole project finished by the end of this session. Now, that’s pretty ambitious and if it doesn’t work out you might have some kids who need to carry their work over into Session 3. You should have time in Session 3 to let them do that, if necessary.
You’re going to show some graphic examples of the patterns that are in some vases, just for inspiration. You’ll show it to them on the screen. I made a printout that you could also have at tables. Now the idea with this is inspiration. You don’t want kids going to their seat and saying, “Okay. I need to make an exact replica of this dragon on my vase.” They are going to struggle with that. It’s hard.
This is for inspiration so they can look at this to get the essence of what a dragon’s mouth looks like or what their tail looks like. But the truth is, they can use their imagination and come up with it and they’ll feel more proud if it’s their own unique work and you’re success rate will go way up because there’s no right or wrong answer.
There’s examples of butterflies and flowers and really cool symbols and vines and waves and clouds. This is all just for inspiration.
Complete the Studio Project
So if you kiddos who are feeling a little apprehensive about just diving right in with paint on theirs, we also have some practice sheets. So every style of stencil is included in this resource. I also have a practice sheets available.
The practice sheet is so simple. It just looks like this. So the idea is, you would cut this in half. There’s a whole bunch of them depending on which stencil the kiddos choose. Each print out has two practice sheets on it for different styles.
You hand the kiddos, if they want, a practice sheet. They can sit there and sketch their idea first, if they feel more comfortable doing that. Now, I want to warn you. Every time I make practicing an option, it’s a huge time suck.
If you’re trying to stick with the timeline here and get this thing done by the end of Session 2, I would either not mention practicing or set up a timer so that you’re saying, “Okay, I’m giving you 5 minutes to test out a dragon drawing or a flower drawing but then I need everybody to move on.”
So you’re going to have them using a small brush. Personally, I recommend a size 2 brush so they can get in some detailed work on their vases. The slideshow guides them through how to break their vessel up into sections and just enough guidance to make it feel like, “Okay I think I can do this” but open-ended enough that they’re walking away feeling, “This is my unique design.”
Don’t make anyone feel like they need to make a replica of what they see on the screen. You don’t want all the projects looking exactly the same at the end. They’ll feel a much stronger connection to the process if they’re putting their unique vision into it.
I like to offer blue liquid watercolor paints. I found that if I put out my normal go-to pans, like a Crayola 16 pan, all of the kids are gunning for that blue. It’s not long before your trays have every color available except blue which is the only color they need for this project. That is why I like to go for liquid water color.
You could also use a slightly watered-down dark blue tempera paint or acrylic. You could even have them do this whole project with dark blue markers or blue Crayola markers even are pretty close and tone to Cobalt, which is what they’re aiming for.
Once they get the pattern on their vessels, it dries pretty quickly. You’re going to have them then move on to adding their branches with blossoms on them. They’re going to use a Sharpie marker, or any kind of black marker, to draw these three to five branches coming up out of that vase.
I don’t have a printable connected to that but there is a really simple visual in the slide show that usually is enough to help them get the gist of it if they don’t already know how they want to make their branch. That part takes less than a minute. It’s very quick.
Then you’re going to hand them tempera paint. You can offer a wide variety of colors. You can narrow it down so they only have two or three choices. That is up to you. I typically give them a few choices but they use a bigger paintbrush to add blossoms. More like this one. It’s a six but you go up to 12. I’ve even had them use their finger. I’ve had them use Q-tips. How they add that paint is pretty flexible.
I have them go with their darkest color first. So, in this case, it was the pink color. They add a pink dab to the end of every twig or branch. Then they add a white one. Then they add a green one. Then they can go in and fill in a couple more if they feel like it.
Here’s an example. If you offer yellow, white, and green. I usually pick a color and then white and green. Mix the colors together with that white and you get a little variation. It’s just a dab. It’s not any particular challenging technique relating to those blossoms. That’s why I like blossoms. Even when you look at the pictures, they’re really quite simple.
If you have kids who are feeling ambitious and they’re just determined to put daisies and roses and tulips and all kinds of other flowers, I don’t get in their way if they want to do that. I let them have at it. The outcomes are usually incredibly whimsical and just delightful.
You can decide if you want to make room for that in your group or not. Once they get to the end of that, they are done with the studio project. In a perfect world, that happens at the end of Session 2. If it needs to carry over into Session 3, so be it.

Fun Facts
Session 3 really has kids looking at a couple of fun facts. There’s some cool fun facts but then they’re going to do a lesson review.
Lesson Review
I put in my own lesson review there to share with you but if you want to customize that there’s some blank slides where you can customize it.
Art Show
Then you’re going to have them do the art show where they spread out all the finished pieces on a table or on the floor and form a circle around them. We just have a good old-fashioned critique.
You’re trying to get the kids used to the idea of talking about art. Talking about art is an invaluable skill. Receiving feedback and giving feedback are the skills that ultimately carry over into every other learning and professional experience they will have in their futures, so don’t brush off this part of the lesson. This is a big one.
You want to model using the vocabulary words that were introduced in the digital storybook. You really want to guide them through some ways of talking to each other about the really cool things that are happening in their projects. There will be some cool things happening so you shouldn’t be short on things to discuss.
I put some guided questions for that art show. If you feel inclined, follow them. If you want to let that conversation flow organically, that works too.
Self-Assessment
Now there is a self-assessment provided in Session 3. It looks like this guy. You can print this out and have each kid fill it out independently. You could show it up on your smart board and go through it as a whole group.
- “How did I cut out that vase? Did I did I use the stencil in a way that made a vase that I feel good about?”
- “Did I use that blue paint in a way that shows I was clearly trying to include patterns and motifs?”
- “Do they look cool?”
There’s a spot for Teacher Comments if you do print this out. This is a great opportunity to give kids individual feedback. It can be a little time-consuming, but if you’ve got a small group of kids and you feel inclined, this is an awesome way to give that feedback.
When the kids are finished, you then paper clip it to their finished project when you send it home. It helps their parents, or whoever is looking at their backpack when they get home, to see what they were doing in art class and what this unit was all about. It helps them have a conversation with the kiddos about what they created.
Early Finishers
There are a couple of early finisher suggestions if you have kids flying through this. I don’t typically have kids flying through it. I have kids running out of time on this one.
But if you have some kids that went really fast, I suggest having a bunch of these empty sheets on deck and encourage anyone who gets done early to pick one that is not the one that they used in their project and just practice adding different details this time. I have kids who ask for these on free draw days. It’s sort of adjacent to a coloring book activity but it has them really filling out the work.
So that’s one suggestion. Another one is a literacy connection. It is a book from 1995. Someone gave it to me when my kids were little. It’s such a sweet little book. I feel like it connects to this unit not in a literal way but the title is The Princess the Mud Pies and the Dragon.
It has this little girl who is working with mud and she’s shaping it, so there’s a connection to the idea of working with pottery. Then this dragon comes along and because a lot of kids in second and third grade want to incorporate a dragon into their design, they appreciate the connection to the dragon.
They like looking at how this artist illustrated their dragon. It’s a book that you can get on Amazon. You might be able to find it in a local library. There’s one read aloud I was able to locate on YouTube if you want to take advantage of that and if you don’t have access to the book yourself. It’s out there.
That will bring you to the end of this unit. I hope that you feel inspired to give this one a shot. I hope your kids have fun with it. I would love to see pictures if you do decide to give it a try. If you have any questions, of course, don’t hesitate to reach out. Okay, that’s it for this one. Thanks for listening.
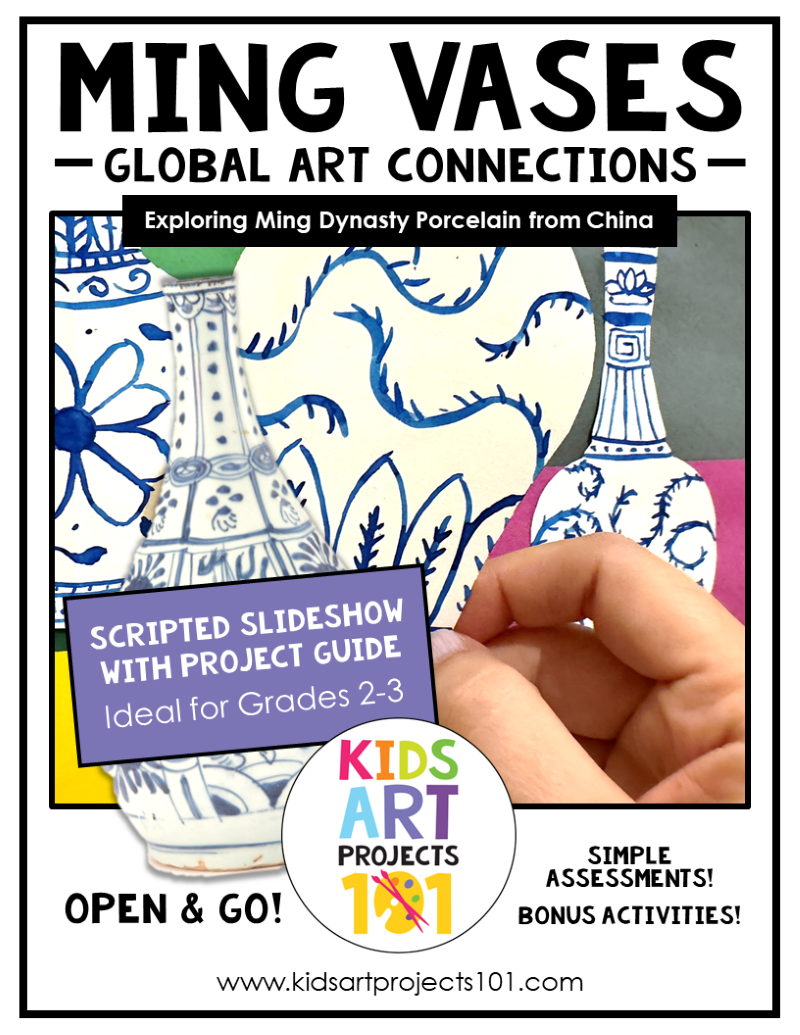
Introduce children to Chinese porcelain and explore making art inspired by Ming Vases in this series of three elementary art lessons. Use the done-for-you digital storybook to look at different examples of blue and white porcelain and provide a beginner level introduction. Then use the digital presentation with step-by-step art project directions to guide young artists as they create their own array of Ming Vase artwork in this art project for elementary students.
Inside the unit you’ll find a 27-page PDF unit guide full of information and tips for teaching this series of art lessons to students in second or third grade.
I personally use this lesson as part of my third grade curriculum which focuses on global art connections.
The Ming Vases Chinese Porcelain Art Project unit is broken down into three 40-minute sessions.
✨You don’t need a lot of background knowledge of the artist or art curriculum, and you don’t have to do any extra research to teach these art lessons. I’ve included all the details here for you to open and go. Think of how much time you’ll save on planning!
For each session there is a guided digital presentation that has already been prepared for you and can be used via Google Slides or PowerPoint. The presentation also introduces and guides you through completion of a studio project and follow-up activity.
The 90-page combined PDF and Google Slides full resource includes:
- An original digital storybook designed to expose students to blue and white porcelain vases from China’s Ming dynasty
- Digital and printable step-by-step studio project guides with clear directions and visual samples
- A literacy connection to Silly Billy by Anthony Browne (book not included)
- Quick fun facts
- A digital lesson review
- A printable self-assessment
- Early finisher suggestions
- Blank slide templates

 George Rodrigue Blue Dog Art Project and Elementary Art Lessons