
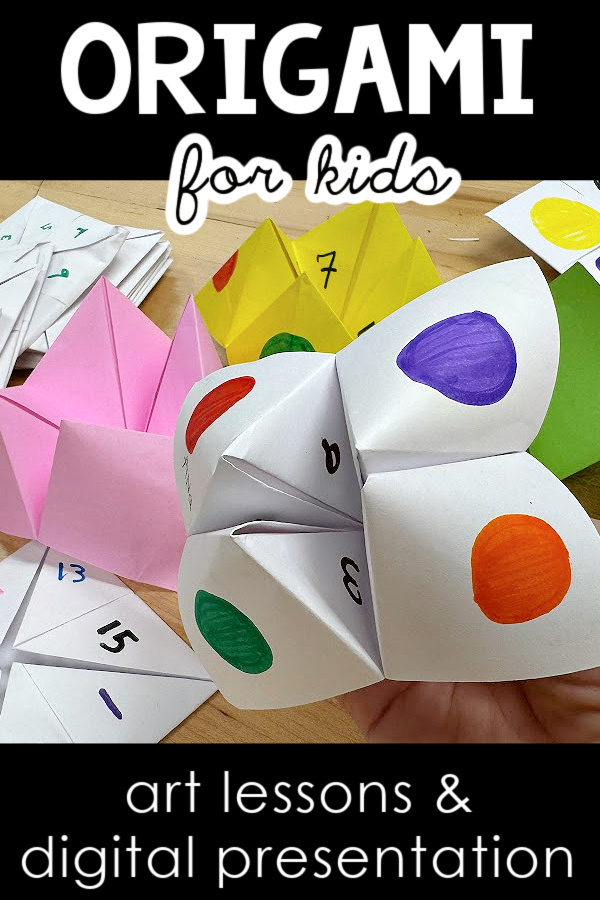
This Origami Art Project is part of my third grade curriculum that is focused on global art connections. This art project introduces young artists to the art of paper folding as students create their own fortune teller origami art project.
Global Art Connections Series from Kids Art Projects 101
This approach is awesome because it layers art history connections with guided instruction about the elements of art and principles of design. The scripted PowerPoint format can be easily utilized in a variety of settings. In this video I share specific tips and considerations to help you implement the unit with ease.
Watch the video, or read the transcript below if you prefer.
Hi Everyone,
I’m excited to present another installation in our Global Art Connections Series. This one is all about the Japanese art of paper folding. We’re talking about origami. This video aims to give you an overview of how I set up the unit so that once you start it with your kiddos, you can hit the ground running. So let’s dive right in.
I’ve organized this one into three distinct sessions. Sometimes I organize them into four sessions. So be aware this one is a little bit quicker. In this overview, you’ll get a sense of how I have set it up. If you need to modify it for your setting you should be able. In an ideal world, we’re talking about three sessions that are 40 to 45 minutes each.

JAPANESE ORIGAMI ART PROJECT SESSION 1
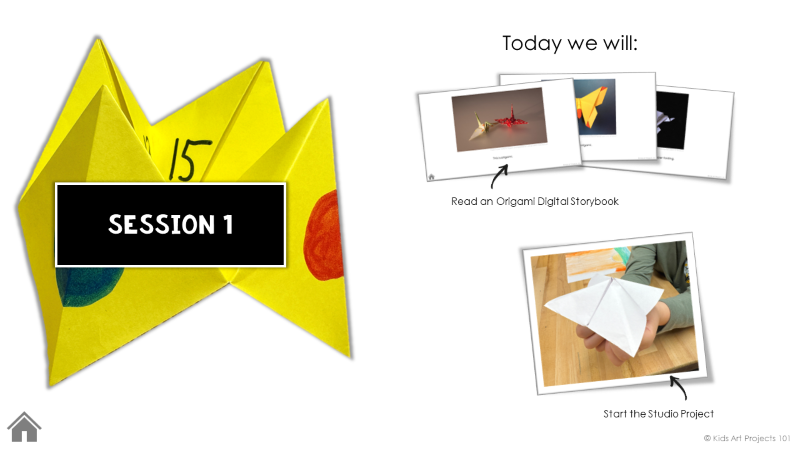
Digital Storybook
In the first session, I have kiddos going through a digital storybook. I have included in our slide show tons of visual references of different examples of origami.
We talk about where origami comes from and the origin of that word. There are different kinds of origami paper. Origami paper is square. We try to cover a lot of elements. This is all about folding.
It’s a practice that a lot of people love and find relaxing. It requires patience and precision. It’s a very unique sort of strategy in the art world. You have to follow the directions to get the answer right.
There aren’t that many other art forms that have that formula so it’s almost more a math type of art form. Some kids respond so positively to it for that very reason.
Start the Studio Project
After you go over the digital storybook in Session 1 we transition right away into the Studio Project. For this unit, our studio project of course is an origami project.
I decided that one of the most kid-friendly origami projects I know of is the fortune teller. I love to teach it to kiddos because you have a sense that you’re introducing them to something that will lock in and be memorable for them.
In the first session, you go over all the steps on how to fold the fortune teller. I set up a video tutorial. I found with experience that that seems to be something that yields the highest success rate. Origami can be tricky, especially for your younger kiddos who are still working out their fine motor skills, and folding things in half is challenging for them.
The video tutorial format frees you up to circulate and provide assistance. It allows you to make sure everyone’s staying on pace and not slipping through the cracks and getting discouraged.
Another approach I like to employ with this is peer partnering. You’re going to see right away that some kids will say, “I’ve done this one. I love origami. I have an origami book.” Those are the kids you want to pair or seat next to you your struggling kiddos because they are folding theirs faster.
Then they’ve got time to help the kid next to them. They seem to enjoy helping kids. You can call them helpers. They love the title. The video is paced in such a way that kids should follow. It’s meant to be a fold-along type of video.
You might want to watch it in advance or start the video in advance, to make sure that you are able to play it successfully. There’s a link in there to a Vimeo format, a YouTube format, there’s an embedded video. You want to make sure that you can play the video, and you can get sound on the video.
I provided some Plan B options. There is, of course, a printed step-by-step set of directions that you could use yourself and model everything live in the room. I’ve done that for years. It works. It means that you aren’t able to walk around and help kids as much.
The other option is to print a handful of these, put them around the room, and have kids self-pace through the steps. I like to have these in my room for kids who are absent or for early finishers.
Kids love this project. Even older kids who have already done it will sometimes forget the steps, and when they see printouts like this, say, “I want to try this one again.” Just know that that is included in the resource if your video tutorial option falls through. Hopefully, it doesn’t.
Now when they get to the end of Session One the goal is for every kiddo in your group to have completed the folds in the fortune teller. The fun thing about the fortune teller is that it’s considered an action origami meaning it’s meant to be manipulated.
Some origami is meant to be simply put on display. This one is meant to be interactive. It turns into a little game. You have kids go through the folds in Session 1, and then they leave the projects with you.
JAPANESE ORIGAMI ART PROJECT SESSION 2
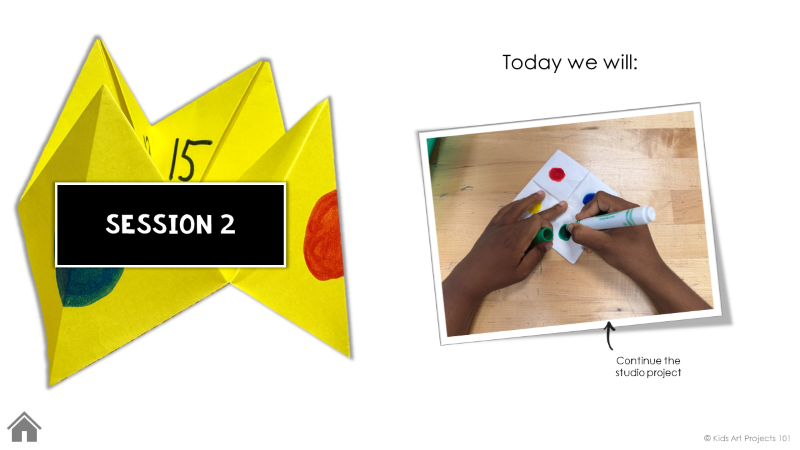
Continue the Studio Project
When they come back in Session 2, you are doing another series of tutorials. So make sure your tech is still up and running for Session 2.
We talk about how to label one side of the project with colors. How to label one side of the project with numbers. Then how to label the inside panels with fortunes.
There’s a good discussion in the slide show on what is a fortune and what are appropriate fortunes and some fun options to consider. It helps give kids some structure to what they’re trying to write in there so you don’t end up with a bunch of kids writing “your feet smell” and that kind of thing.
In Session 2 you go over some fun facts and you really just dive right back into the project. It takes time. They are slow writers. You’ll find that by the time they get done labeling all of this, you’re out of time.
So you’re having them leave the projects. It’s hard for them. They want to take them. So share with them in Session 3 they’re going to watch one last tutorial where they learn how to play with the fortune teller.
JAPANESE ORIGAMI ART PROJECT SESSION 3
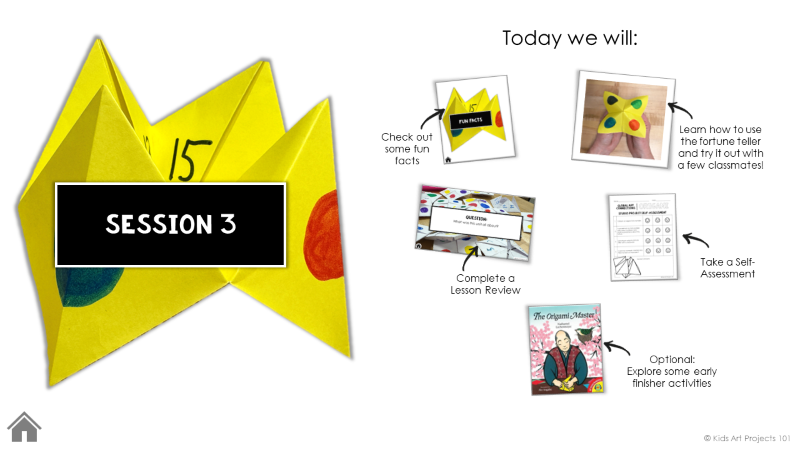
Learn to Use a Fortune Teller
There’s no proper format in the real world, but you’re teaching them how to get the official rules on how to play with a fortune teller. I hope it lines up with the way you’re familiar with doing it.
Basically, you are going to teach them that they’re inviting someone to select a color. Then select a number. Then select a second number. Once they pick the second number, they lift up the panel and read a fortune. There’s a video tutorial that teaches them how to do it.
Art Show
The art show modification in the last session is that they walk around and actually play with their fortune teller with at least three classmates. You want to anticipate that there’s going to be a good 7 to 10-minute portion of Session 3 where the kids are milling around, playing with these.
You want to encourage them to read at least three different kids’ fortunes. It goes both ways. If I ask you to play with me, then I’ll play with yours. That takes time, but I figured that is a more effective way to get them to show off their work to kids and look at other kids’ work than putting them all out on display.
From the outside, there’s a certain similarity. They all have that same basic look. It’s hard to think reflectively on it. Although some kids do some really cool creative stuff with them.
Lesson Review
You’re going to have them go through a lesson review after they’ve played with their fortune tellers. I wrote several different review prompts, but there are blank slides in the slideshow that you could customize a review if you wanted to cater it towards something specific about what you talked about or the way you presented things.
Self-Assessment
Then you have a self-assessment.
By the way, there’s a printout that talks about how to color, number, and label the fortune tellers as well. This is included in the resource if you run into any tech issues. Be aware that you have this printable.
You could display this if you don’t want to do the video format. You could put this up on a big screen. You could print some of these out and let kids look at them independently.
Once they get to the self-assessment, this is another piece of paper that you could just display digitally. You could choose not to display it and just pull it up on your device and read these to the kids. You could print them out.
- I folded an origami fortune teller.
- I embellished my Fortune Teller with colors, numbers, and positive predictions about the future.
- I practiced using my fortune teller with a classmate.
The fourth one has to do with effort and craftsmanship.
There’s a spot here to write notes to the individual students or to the students’ parents. This is something that you can print out and send home after Session 3. It helps parents understand what the unit was all about, but that’s optional.
You could choose to display that and have that be an informal discussion with the kiddos during the session, and then have them take their fortune teller home at the end of Session 3.
Early Finishers
There’s one other component in Section 3 that I included. That’s early finisher suggestions. They’re really simple.
I suggest if you have kiddos that have extra time, if you happen to have origami books in your classroom or some printed directions and some packs of origami paper, they can try other shapes. If they have access to computers or devices, or tablets in your room they could look up some tutorials.
The YouTube channel for Art for Kids Hub has an origami playlist that is super kid-friendly. That’s a great place to start if you’re not sure where to look for stuff that’s appropriate for kiddos. That’s a safe one to try.
I put a list of little keyword searches you can try. There are a couple of projects that are really great for beginners. They are classics.
The other thing I put in as an early finisher suggestion is a storybook called The Origami Master. It is adorable. If you happen to have a copy, read it to your kiddos.
If you don’t have a copy, try to find it at the library or do a free read-aloud online. It is a sweet book and it’s a great filler activity if you happen to have 10 extra minutes in any of the three sessions while you’re going over this unit.
Then the last thing I wanted to make sure you are aware was included in this resource is this guy. This is something you can print out. You could hand it to a kid. You can hang it up on a wall in your room. You could put it on a screen at the front of the room for your early finishers.
If they’re looking at you going, “Well, now I need origami paper to do this, and you don’t have any.” Or you ran out of paper. Anything like that. This walks kids through the four basic steps to change a piece of printer paper into a square.
Once it’s a square, the sky’s the limit. They can make all the origami projects they please. It’s really a gift to teach kids how to do this because then it frees them up on regular free draw days if they really enjoy origami.
You don’t have to hear them nagging you for origami paper. I just want you to know this is there. This is a really handy resource to keep on deck.
That brings us to the end of this one. I hope it’s a positive experience for you. I would love to see pictures or videos of your kiddos in action. Please don’t hesitate to reach out if you have any questions. That is it! I hope you enjoy this one, and thanks so much for listening.
Get the full unit!

Introduce children to the concept of origami, the Japanese art of paper folding in this series of three elementary art lessons. Use the done-for-you digital storybook to look at different examples of origami and provide a beginner level introduction. Then use the digital presentation with step-by-step art project directions to guide young artists as they create their own fortune teller art project.
Inside the unit you’ll find a 23-page PDF unit guide full of information and tips for teaching this series of art lessons to students in second or third grade.
I personally use this lesson as part of my third grade curriculum which focuses on global art connections.
The unit is broken down into three 40-minute sessions.
✨You don’t need a lot of background knowledge of the artist or art curriculum, and you don’t have to do any extra research to teach these art lessons. I’ve included all the details here for you to open and go. Think of how much time you’ll save on planning!
For each session there is a guided digital presentation that has already been prepared for you and can be used via Google Slides or PowerPoint. The presentation also introduces and guides you through completion of a studio project and follow-up activity.
The 89-page combined PDF and Google Slides full resource includes:
- An original digital storybook designed to expose students to the Japanese art of paper folding: Origami.
- A step-by-step studio project guide with clear directions and visual samples
- A beginner level introduction to folding an origami fortune teller
- A digital lesson review
- A printable self-assessment
- Early finisher suggestions
- Blank slide templates

 Free Editable Art Lesson Plan Templates and Standards Checklists